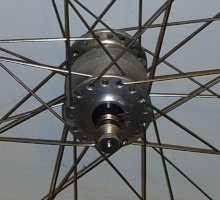
SON 28 Hub Dynamo
Bearing replaceemnt
The Right To Repair movement are on the correct track. Having parts or information needed for repairs restricted only to the manufacturers or sometimes appointed dealers is exploitative. That's the case with the SON 28 hub dynamo; When the bearings need to be replaced, the only authorised way is to dismantle the wheel and send the hub back to the factory in Germany. Seriously! So when my friend Martin said he had one with water damage that wasn't worth sending back that I could experiment on, how could I resist.
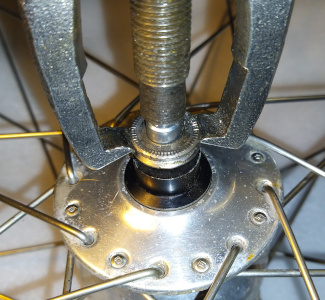
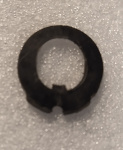
The obvious starting point is to remove the fittings from the axle. A little experimentation confirmed that the silver rings are a (tight) interference fit. In the end they yielded to a gear puller that I'd ground to better fit the groove and an engineer's clamp to hold it in place. After removing a plastic washer, the electrical terminals are relealed, which must be unsoldered. This (and the resoldering during reassembly) is the only part that a Local Bike Shop might be unfamiliar with. Then all of the black parts slide off the axle.

That gets us to the bearings. The SON 28 has a bulge in the middle contining the electrical parts, and, unless the hub is assembled like a ship-in-a-bottle, the only way it can be disassembled is to separate the two halves of the shell, hence having to dismantle the wheel. Other hub dynamos are like this, for example the Shutter Precision PV8. An internet search reveals that the SON 28 shells press fit together and the SP PV8 is a bayonet (twist fit). If I could get the bearing out without all this dismantling that would save a lot of labour, and a little investment of time to work it out would be a good investment. This turned out to be impossible because there is a flange on the shell, which means the bearing can only go inwards.
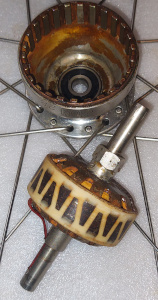
Plan B. I unscrewed the spokes on one side of the wheel and, leaving them in their holes, fastened them together in two groups using rubber bands. Before separating the shell, put a mark across the joint so that it can be reassembled in the correct orientation. As I had already removed the inner half of one of the bearings in my earlier attempts, I tried tapping lightly with a mallet to separate the shell. Success. A gear puller or some leverage between the flanges would be a better option. The bearings slide easily along the axle.
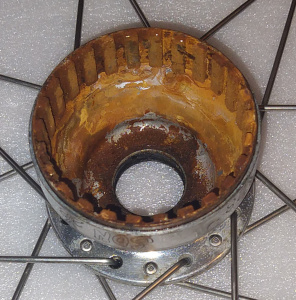
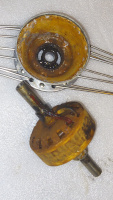
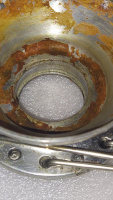
The state of the innards made my heart sink. Rust. Lots of rust. Deep breath. It's mostly cosmetic. As long as the bearings seat on the axle properly and the rust on the stator doesn't hit the magnets there shouldn't be a problem. Fine emery paper on the axle and coarse on the stator sorted that out. The bearing surfaces and joint in the shell should now be cleaned up. Some magnetic debris was removed from the magnets.
The bearings are deep groove type, 9mm inside diameter, 26mm outside diameter and 8mm thick, with rubber seals. AKA 9x26x8 2RS, AKA 629-2RS. Remember that the opening in the shell is smaller than the bearing, so don't measure that. Inserting the new bearings is bread-and-butter work for a LBS. The home mechanic should note the following: apply grease to the housing and bearing; ensure that it goes in straight otherwise it could jam and/or cause damage. Also, when installing bearings, never put any force through the bearing to do so. In this case that means pressing only on the outer race. In the absence of the correct tool, the traditional way is to use a socket spanner of the right size.
Reassembly is, as they say, the reverse of disassembly, but it's worth testing with a voltmeter at each stage to ensure that it is working electrically.
The wires go out the engraved side of the shell. Remember to align the shell halves according to the line that you put on earlier. It's no longer visible? Two things to get right: the holes in the flanges are not opposite each other, rather they are staggered; and the spokes next to the valve hole should be angled away from the valve hole. That gives eight correct orientations in a 32 hole hub. Failure to get that latter bit right means removing all of the undone spokes from their holes and reinserting them one hole round. Press the shells together using whatever method you can devise.
The only remaining gotcha is that grease or dirt on the wires or connectors should be removed otherwise it won't solder properly. Finally, a rear quick-release skewer and some spacers are a perfect way to drive the silver collars into place.